Interfacing GPS with Arduino (Neo-6M-001)
What is a GPS Module?
Every single location in the entire globe can be specified in terms of geographical coordinates. The geographical coordinate is a system which specifies any given location on the earth surface as latitude and longitude. There are devices which can read the geographical coordinates of a place with the help of the signals received from a number of satellites orbiting the earth. The system of satellites which helps in the positioning of a place is called Global Positioning System (GPS). The devices which can read the geographical coordinates of a place with the help of at least four GPS satellites are called GPS Receiver or simply GPS module.
Specifications:
• Build in 18X18mm GPS antenna
• Anti-jamming technology
• 5Hz position update rate
• Operating temperature range: -40 TO 85°C
• UART TTL socket
• EEprom to store settings
Material Required:
Material Quantity
Arduino Uno 1
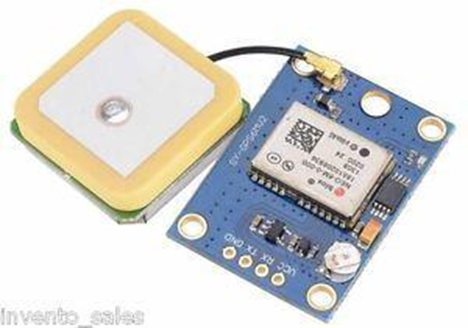
GPS Module 1
Jumper cables 4
Working:
GPS satellites circle the Earth twice a day in a precise orbit. Each satellite transmits a unique signal and orbital parameters that allow GPS devices to decode and compute the precise location of the satellite. GPS receivers use this information and trilateration to calculate a user's exact location. Essentially, the GPS receiver measures the distance to each satellite by the amount of time it takes to receive a transmitted signal. With distance measurements from a few more satellites, the receiver can determine a user's position and display it.
To calculate your 2-D position (latitude and longitude) and track movement, a GPS receiver must be locked on to the signal of at least 3 satellites. With 4 or more satellites in view, the receiver can determine your 3-D position (latitude, longitude and altitude). Generally, a GPS receiver will track 8 or more satellites, but that depends on the time of day and where you are on the earth.
Once your position has been determined, the GPS unit can calculate other information, such as:
Speed
Bearing
Track
Trip dist
istance to destination
Download and install required libraries for GPS to work in Arduino IDE
(i) SoftwareSerial library
(ii) TinyGPS library
Click on the highlighted link to download the Library.
Circuit Diagram:
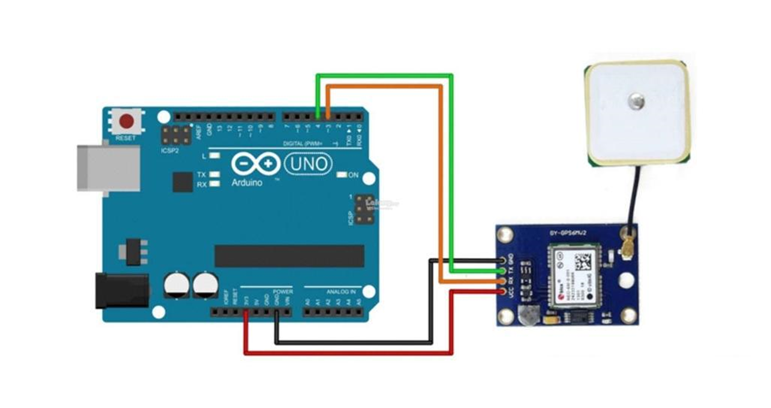
Connection of Arduino UNO and GPS module :
Connect the four pins from UBLOX to an Arduino as follows:
Ublox - Arduino
GND - GND
TX - Digital pin (D3)
RX - Digital pin (D4)
Vcc - 5Vdc
Here, I suggest you to use external power supply to power the GPS module because minimum power requirement for GPS module to work is 3.3 V and Arduino is not capable of providing that much voltage.
Tested Programming Code:
#include <SoftwareSerial.h> #include <TinyGPS.h> SoftwareSerial mySerial(3,4); TinyGPS gps; void gpsdump(TinyGPS &gps); void printFloat(double f, int digits = 2); void setup() { // Oploen serial communications and wait for port to open: Serial.begin(9600); // set the data rate for the SoftwareSerial port mySerial.begin(9600); delay(1000); Serial.println("uBlox Neo 6M"); Serial.print("Testing TinyGPS library v. "); Serial.println(TinyGPS::library_version()); Serial.println("by Mikal Hart"); Serial.println(); Serial.print("Sizeof(gpsobject) = "); Serial.println(sizeof(TinyGPS)); Serial.println(); } void loop() // run over and over { bool newdata = false; unsigned long start = millis(); // Every 5 seconds we print an update while (millis() - start < 5000) { if (mySerial.available()) { char c = mySerial.read(); //Serial.print(c); // uncomment to see raw GPS data if (gps.encode(c)) { newdata = true; break; // uncomment to print new data immediately! } } } if (newdata)
{ Serial.println("Acquired Data"); Serial.println("-------------"); gpsdump(gps); Serial.println("-------------"); Serial.println(); } } void gpsdump(TinyGPS &gps) { long lat, lon; float flat, flon; unsigned long age, date, time, chars; int year; byte month, day, hour, minute, second, hundredths; unsigned short sentences, failed; gps.get_position(&lat, &lon, &age); Serial.print("Lat/Long(10^-5 deg): "); Serial.print(lat); Serial.print(", "); Serial.print(lon); Serial.print(" Fix age: "); Serial.print(age); Serial.println("ms."); // On Arduino, GPS characters may be lost during lengthy Serial.print() // On Teensy, Serial prints to USB, which has large output buffering and // runs very fast, so it's not necessary to worry about missing 4800 // baud GPS characters. gps.f_get_position(&flat, &flon, &age); Serial.print("Lat/Long(float): "); printFloat(flat, 5); Serial.print(", "); printFloat(flon, 5); Serial.print(" Fix age: "); Serial.print(age); Serial.println("ms."); gps.get_datetime(&date, &time, &age); Serial.print("Date(ddmmyy): "); Serial.print(date); Serial.print(" Time(hhmmsscc): "); Serial.print(time); Serial.print(" Fix age: "); Serial.print(age); Serial.println("ms.");
gps.crack_datetime(&year, &month, &day, &hour, &minute, &second, &hundredths, &age); Serial.print("Date: "); Serial.print(static_cast<int>(month)); Serial.print("/"); Serial.print(static_cast<int>(day)); Serial.print("/"); Serial.print(year); Serial.print(" Time: "); Serial.print(static_cast<int>(hour+8)); Serial.print(":"); //Serial.print("UTC +08:00 Malaysia"); Serial.print(static_cast<int>(minute)); Serial.print(":"); Serial.print(static_cast<int>(second)); Serial.print("."); Serial.print(static_cast<int>(hundredths)); Serial.print(" UTC +08:00 Malaysia"); Serial.print(" Fix age: "); Serial.print(age); Serial.println("ms.");
Serial.print("Alt(cm): "); Serial.print(gps.altitude()); Serial.print(" Course(10^-2 deg): "); Serial.print(gps.course()); Serial.print(" Speed(10^-2 knots): "); Serial.println(gps.speed()); Serial.print("Alt(float): "); printFloat(gps.f_altitude()); Serial.print(" Course(float): "); printFloat(gps.f_course()); Serial.println(); Serial.print("Speed(knots): "); printFloat(gps.f_speed_knots()); Serial.print(" (mph): "); printFloat(gps.f_speed_mph()); Serial.print(" (mps): "); printFloat(gps.f_speed_mps()); Serial.print(" (kmph): "); printFloat(gps.f_speed_kmph()); Serial.println(); gps.stats(&chars, &sentences, &failed); Serial.print("Stats: characters: "); Serial.print(chars); Serial.print(" sentences: "); Serial.print(sentences); Serial.print(" failed checksum: "); Serial.println(failed); } void printFloat(double number, int digits) { // Handle negative
numbers if (number < 0.0) { Serial.print('-');
number = -number; } // Round correctly so that print(1.999, 2) prints as "2.00" double rounding = 0.5; for (uint8_t i=0; i<digits; ++i) rounding /= 10.0; number += rounding; // Extract the integer part of the number and print it unsigned long int_part = (unsigned
long)number; double remainder = number -
(double)int_part; Serial.print(int_part); // Print the decimal point, but only if there are digits beyond if (digits > 0) Serial.print("."); // Extract digits from the remainder one at a time while (digits-- > 0) {
remainder *= 10.0;
int toPrint = int(remainder);
Serial.print(toPrint);
remainder -= toPrint;
}}
Precautions:
1. Double check the connections before powering on the circuit.
2. Don’t use loose jumper cables.
3. Check whether proper board is selected from Arduino IDE.
4. Ensure proper placement of sensor for correct working..
Conclusion:
You can successfully measure the flow rate and quantity of the water flowing through a pipe through a cross sectional area. This sensor can be deployed in many ways like water level automation system, water meter etc.
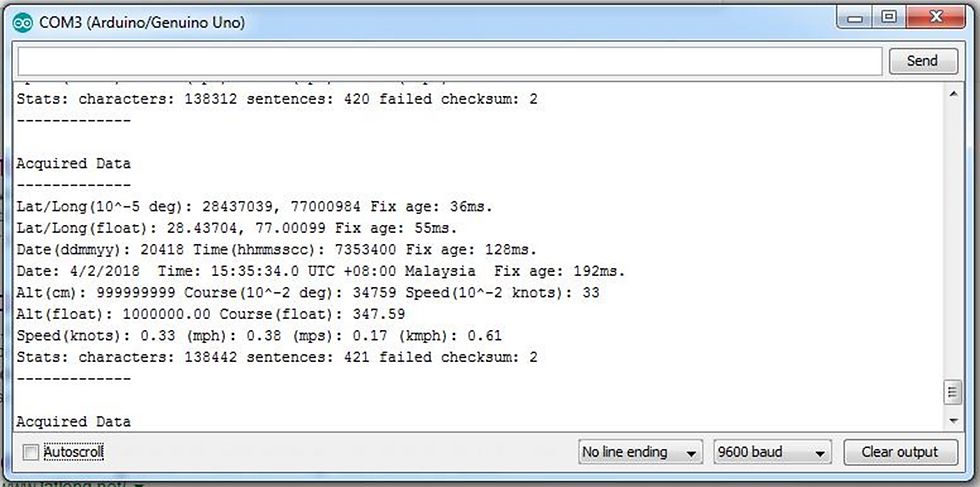
Output:
After you have successfully uploaded your source code, open your serial monitor. Serial monitor will display the data that your gps required. If you didn’t get anything, make sure your connection is correct and try it outside or near the window where it is easy to get the signal. Signal may not reach inside a building.
Situation Screenshot: Serial Monitor (Ctrl+Shift+M)